

Measure your nipple diameter at its base in millimeters, then add about 2 to 4 mm to that number to find your starting flange size. A nipple around this size typically starts with a flange tunnel a few millimeters larger than the nipple diameter, though some retailers recommend adding just 1 to 3 mm instead. There's no single magic number here, and that's actually good news: it means small adjustments, not guesswork, get you to the right fit.
- Measure at the base, not the tip, and not the areola.
- Medela's guidance suggests starting 4 mm larger than your measurement; Cleveland Clinic recommends 2 to 4 mm.
- Measure both nipples. They're often different sizes.
Pro Tip: Test your starting size during an actual pumping session, not just against a ruler. Nipples change under suction, so the number that looks right on paper may need a quick adjustment once the pump is running.
Key Takeaways
Correct flange fit depends on measuring nipple diameter and protrusion accurately, applying a 1 to 4 mm sizing margin, and confirming comfort during an actual pumping session.
| Point | Details |
|---|---|
| Measure at the base | Measure nipple diameter in millimeters at its widest point, not the tip or areola. |
| Add a margin | Add roughly 1 to 4 mm to your measurement, depending on manufacturer guidance, to find a starting size. |
| Check both breasts | Measure each nipple separately since sizes commonly differ side to side. |
| Test while pumping | Confirm fit through a short trial session, watching comfort, movement, and milk flow. |
| Get help when needed | Thriving Joy's lactation counseling offers hands-on fittings when troubleshooting alone doesn't resolve fit issues. |
Table of Contents
- How Do You Measure Nipple Diameter for a Flange?
- What Flange Size Should You Use Based on Your Measurement?
- What Does a Good Flange Fit Feel Like?
- How Do You Fix a Flange That Doesn't Fit Right?
- When Should You See a Lactation Consultant About Flange Fit?
- How Do You Measure Nipple Length for the Right Tunnel Depth?
- Why Does Flange Tunnel Length Matter as Much as Diameter?
- What Happens If You Use the Wrong Flange Size Long-Term?
- Does Flange Size Change During Different Stages of Lactation?
- Frequently Asked Questions
- Sources
How Do You Measure Nipple Diameter for a Flange?
Getting an accurate measurement takes about five minutes, and the routine matters more than the tool you use.
- Wait for a neutral state. Measure a few minutes after a feeding or pumping session, once your nipple has settled back to its resting size. Measuring right after suction, or during engorgement, gives you an inflated number.
- Stimulate briefly if needed. A light touch or a few seconds of gentle rolling helps the nipple extend naturally, similar to what happens once the pump starts.
- Measure straight across the base, at the widest point, using a millimeter ruler, a soft measuring tape, or a printable nipple gauge from your pump's manufacturer. Millimeters matter here. A measurement that's off by even 2 mm can land you in the wrong tunnel size entirely.
- Repeat on the other side. Nipple sizes commonly differ from breast to breast, sometimes by 2 mm or more.
Three common mistakes throw off the whole process: measuring the tip instead of the full base, accidentally including part of the areola in the measurement, and measuring while swollen or immediately post-pump when tissue is temporarily larger than usual.
Here's what this looks like in practice. A base measurement of 14 mm points toward a smaller starting tunnel. A 17 mm base measurement lands in the mid-range most pumps ship with. A 22 mm base measurement usually means the "medium" flange that comes standard in most pump boxes won't fit well, and you'll need to size up.
Pro Tip: Skip the household ruler with worn edges. A printable gauge from your pump brand gives cleaner millimeter lines and removes the guesswork of eyeballing between marks.
What Flange Size Should You Use Based on Your Measurement?
Once you have your base measurement, the conversion math is simple, but the exact margin depends on whose guidance you follow. Medela's Room to Move approach recommends starting about 4 mm larger than your measured diameter. Cleveland Clinic recommends a slightly tighter 2 to 4 mm margin. Retailers like Storkpump often suggest an even closer 1 to 3 mm. None of these are wrong; they're just different starting philosophies, and testing while pumping is what actually settles the question.
A few worked examples make this concrete:
- 15 mm nipple → start around an 18 to 19 mm tunnel.
- 17 mm nipple → start around a 19 to 21 mm tunnel.
- 18 mm nipple → start around a 20 to 22 mm tunnel.
Most manufacturers sell flanges in 3 to 4 mm increments rather than every single millimeter, so you'll often land between two available sizes. That's exactly what silicone inserts and disposable liners are built for. An insert effectively narrows the tunnel by a few millimeters without requiring you to buy a whole new flange, and it's a genuinely useful fix when your measurement sits right in the gap between two stock sizes.
Check your pump's packaging or manufacturer site before buying anything new. Medela, for instance, publishes printable rulers and lists standard shield sizes across its product lines, which saves you from measuring against a bent tape measure at 2 AM.
Pro Tip: When you're stuck between two sizes, try the smaller tunnel first. A too-loose flange tends to cause more comfort and output problems than a snug one, though "snug" should never mean painful.
What Does a Good Flange Fit Feel Like?
A properly fitted flange feels almost boring, which is exactly the point. Your nipple should move freely inside the tunnel without rubbing against the sides, stay centered throughout the session, and return to its normal color and shape once you're done pumping. Milk should flow steadily after let-down, and discomfort should be minimal to none.
The signs of a too-small flange are harder to ignore. Watch for rubbing or pinching sensations, redness, bruising, or a nipple that looks creased or blanched (a pale ring where the tissue is being compressed) by the end of a session.
A too-big flange causes a different set of problems. Too much areola gets pulled into the tunnel along with the nipple, suction feels weak or inconsistent, and even though the nipple moves freely, milk output stays disappointingly low. Some parents describe the nipple looking oddly stretched or elongated afterward.
Fit isn't just about comfort in the moment. Poor flange fit reduces pumping efficiency and can cause nipple trauma over time, which means the wrong size doesn't just feel bad. It can quietly undercut your milk supply.
If something feels off, stop the session. Try a larger tunnel or an insert, re-center the nipple, lower the suction, and do a short 5 to 10 minute trial before committing to a full session. Persistent pain or visible tissue damage means it's time to stop troubleshooting on your own and get an actual clinical opinion.
How Do You Fix a Flange That Doesn't Fit Right?
Most fit problems have a fix you can try immediately, before you order new parts or book an appointment.
- Re-center the nipple inside the tunnel. Off-center placement is one of the most common, and most fixable, causes of rubbing.
- Lower the suction setting. A lower level often solves discomfort without changing anything about the flange itself.
- Switch to a clear flange if you have one, so you can actually watch how the nipple moves during a cycle instead of guessing based on feel alone.
- Try a sizing insert to narrow a tunnel that's running slightly too big.
- Shift your position slightly. Leaning forward or adjusting the pump angle sometimes changes how the nipple sits in the tunnel.
A few practical notes worth keeping in mind:
- Silicone inserts are a legitimate, affordable way to bridge the gap between two stock sizes rather than buying an entirely new flange.
- Not every pump accepts every insert or third-party flange, so check your specific pump's manual before ordering anything.
- Never crank up the suction to compensate for a bad fit. That's a shortcut to tissue damage, not better output.
If you've tried these adjustments across a few sessions and comfort or output still isn't improving, that's your signal to try a different flange size altogether or bring in a lactation consultant.
When Should You See a Lactation Consultant About Flange Fit?
Some fit problems resolve with a smaller tunnel or an insert. Others need a trained set of eyes. Reach out for professional help if you're dealing with persistent pain that doesn't ease up after adjustments, visible nipple trauma like cracking or bruising, consistently low output despite trying multiple reasonable sizes, or feeding difficulties that seem tangled up with the pumping issues.
An IBCLC-credentialed lactation consultant, the recognized gold standard in clinical lactation care, will typically observe an actual pumping or feeding session rather than relying on measurements alone. That includes checking baby's latch if you're also nursing, reviewing your pump settings and part compatibility, and doing a hands-on fitting to compare how different tunnel sizes actually perform on your body.
Bring everything to the appointment: your pump, every flange and insert you own, and a clear flange if you have one so the consultant can watch nipple movement directly. A little preparation turns a 30-minute visit into a real answer instead of another round of guesswork.
For ongoing support beyond a single visit, personalized breastfeeding help can catch patterns a one-time fitting might miss.
How Do You Measure Nipple Length for the Right Tunnel Depth?
Diameter gets most of the attention, but tunnel length matters just as much for a pump that actually feels right. To measure protrusion, or how far your nipple naturally extends from the areola, gently stretch or stimulate the nipple the same way you would before a pumping session, then measure from the base to the tip along a ruler held flat against the breast.

Most nipples fall somewhere between 8 and 15 mm of protrusion, though flat or inverted nipples may measure closer to zero until stimulated. This number matters because a tunnel that's too shallow can compress the nipple tip against the back wall on every stroke, which causes pain independent of whatever the diameter fit looks like.
Unlike diameter, which most manufacturers let you adjust through swappable flange sizes, tunnel length is usually fixed within a given flange model. If your protrusion measurement is on the shorter side, look specifically for flanges marketed as shallow or low-profile rather than assuming every brand's standard tunnel will accommodate you. If you measure on the longer side, a standard tunnel usually has enough room, but it's still worth confirming during a test session that the tip isn't hitting the back wall with each cycle.
Measuring both diameter and length before you buy saves you from the common experience of getting the width right and still feeling pinching or pain because the depth was never considered.
Why Does Flange Tunnel Length Matter as Much as Diameter?
Diameter determines how much of your nipple and areola get pulled in. Length determines what happens once they're in there. A flange with the correct diameter but the wrong tunnel length can still cause real problems, which is why fitting by diameter alone sometimes doesn't fully solve the discomfort.
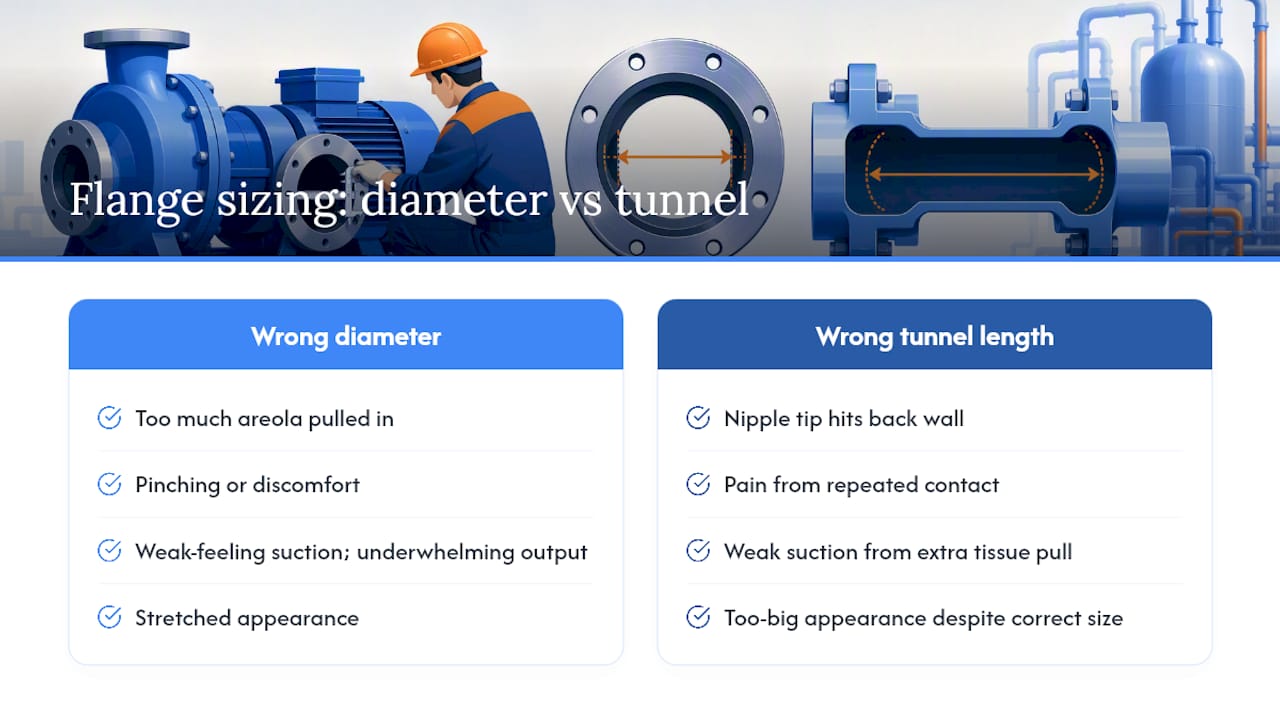
If the tunnel is too short for your protrusion, the nipple tip repeatedly bumps the back wall of the flange during each suction cycle. That contact causes pain that has nothing to do with pinching and everything to do with depth, so parents sometimes assume they need a different diameter when what they actually need is a shallower tunnel.
If the tunnel is too long relative to your nipple's protrusion, too much of the areola gets drawn in alongside the nipple. That extra tissue pull can create the same too-big symptoms described earlier: weak-feeling suction, stretched appearance, and underwhelming output, even when the diameter measurement was accurate.
Manufacturers have started responding to this. Several brands now offer shallow or low-profile flange options specifically for parents whose comfortable diameter fit still caused pain because of tunnel depth. Checking both measurements before you buy, rather than diameter alone, is the difference between a fit that works on paper and one that actually works during a real session.
What Happens If You Use the Wrong Flange Size Long-Term?
A single session with a slightly wrong flange size usually just means mild discomfort. Weeks of pumping with the wrong size compounds into something more serious.
Chronic use of a too-small flange causes repeated friction and compression on the same tissue with every session, which can progress from mild redness to cracking, bruising, or blanching that takes longer to heal between pumps. That tissue damage doesn't just hurt. It also makes parents unconsciously pump less often or cut sessions short to avoid the pain, which itself can reduce milk supply over time.
Chronic use of a too-big flange creates a quieter problem: consistently incomplete milk removal. When the tunnel pulls in too much areola or fails to create adequate seal-based suction, milk transfer stays inefficient even if nothing feels overtly painful. Many parents in this situation don't realize the flange is the issue. They assume their supply is naturally lower, when a sizing adjustment would have solved it.
The comfort cost and the output cost aren't separate problems. They're usually the same problem showing up in two different ways. Getting the fit right early protects both your tissue and your supply, rather than trading one for the other over months of pumping.
Does Flange Size Change During Different Stages of Lactation?
The flange size that fit perfectly at two weeks postpartum may not fit the same way at four months, and that's normal rather than a sign you measured wrong the first time.
During engorgement, especially in the early weeks or after a missed session, breast tissue swells and nipples can temporarily measure larger than their resting size. Sizing a flange during an engorged state risks choosing a tunnel that's too big once the swelling resolves. It's worth measuring again once engorgement has settled to confirm your working size still fits.
Around let-down, some parents notice the nipple elongates slightly more than it does at rest, which is one more reason a short test session matters more than a static ruler measurement.
As lactation continues past the first couple of months, nipple tissue for many parents settles into a more stable size, and some find they can move down slightly from their initial starting flange. Measuring again periodically, rather than assuming the first fit is permanent, catches these shifts before they turn into discomfort. Keeping a second, slightly different flange size on hand for engorged days is a practical habit rather than an overcautious one.
A Lactation Counselor's View on Chasing the "Perfect" Fit
Measurement gets you to a reasonable starting point. It doesn't get you to a finished answer. In practice, fit is something you confirm through a real pumping session, watching how the nipple moves and whether milk flows, not something you settle by ruler alone.
Expect your size to shift with engorgement or as lactation progresses; that's normal, not a sign you measured wrong. Many parents end up using two different flange sizes for their two breasts, and a silicone insert is a perfectly legitimate long-term tool, not just a stopgap. Prioritize tissue health over squeezing out a few extra milliliters. Comfort and output tend to follow each other anyway.
How Thriving Joy Supports Parents Struggling With Flange Fit
Thriving Joy is the alternative to guessing your way through flange sizes alone. Our lactation counseling gives you a hands-on fitting session with an IBCLC, not just a printable ruler and a chart, so you leave with an actual answer instead of another size to try.

A consultation covers a real-time pumping observation, a check of your pump settings and part compatibility, and a comparison of tunnel sizes against your actual measurements, both diameter and protrusion. If nursing is part of your routine too, we'll also look at baby's latch, since flange fit and feeding difficulties sometimes trace back to the same root cause.
Bring your pump, every flange and insert you currently own, and a clear flange if you have one. If you're in the Tampa area and the troubleshooting steps in this article haven't fully resolved your discomfort or output concerns, book a lactation counseling session and get a fitting that's based on your body, not a size chart alone.
Frequently Asked Questions
How do I measure flange size at home without a printable ruler? Use a soft measuring tape or a millimeter ruler placed flat against the base of the nipple at its widest point. Measure a few minutes after a feeding or pumping session, when the nipple is relaxed rather than swollen.
What size flange should I start with for a 16 mm nipple? Based on common clinical guidance, add 2 to 4 mm to your measurement, which points toward an 18 to 20 mm starting tunnel. Test that size during an actual pumping session to confirm comfort and milk flow.
Can flange size change over time? Yes. Engorgement, let-down, and general shifts through different stages of lactation can all temporarily or permanently change your ideal size, so remeasuring periodically is worth doing rather than assuming your first fit is permanent.
Is it normal to need two different flange sizes? Yes. Nipple sizes commonly differ between breasts, and using two different flange sizes, or an insert on one side, is a normal and accepted solution rather than a sign something's wrong.
What's the difference between flange diameter and tunnel length? Diameter determines how much of the nipple and areola the tunnel pulls in, while tunnel length determines whether the nipple tip has enough room to avoid hitting the back wall during suction. Both need checking for a truly comfortable fit.
This article is general information, not a substitute for advice from a qualified doctor. Consult a qualified healthcare professional about your own circumstances before acting on anything here.
Sources
- Finding Your Breast Pump Flange Size
- Room to Move™: A Step-by-step Guide to Measure Your Breast Shield Size
- Breast Pump Flange: Sizing, Fit, and How to Use
- How to Measure Your Flange Size at Home – Storkpump by AdaptHealth