

Yes: hands-on pumping increases milk removal compared with pump-only sessions, and it's worth trying at your very next session. Exclusive pumpers, parents of preterm infants in the NICU, and anyone hoping to boost hindmilk or grow a stash all tend to see the biggest gains. The technique itself is simple to learn, and the steps below walk you through exactly how to do it.
TL;DR:
- Combining massage and compression with pumping can increase milk output by approximately 48% and improve milk fat content.
- Proper pre-pumping techniques, such as warm compresses and breast massage, enhance milk flow and efficiency during sessions.
- Finishing with two to four minutes of hand expression captures the most valuable hindmilk and maximizes total milk volume.
- Ensuring correct flange fit and adjusting hand positioning can significantly boost milk removal, often more than upgrading pump equipment.
- Persistent effort, proper technique, and professional support are more effective than focusing solely on equipment features or routine duration.
Table of Contents
- What Is Hands-On Pumping, and Why Does It Work?
- How Do You Actually Do Hands-On Pumping?
- How Often Should You Pump, and For How Long?
- When Should You Stop, and What If It Hurts?
- What Equipment Do You Actually Need?
- What Do Lactation Practitioners Notice That Parents Often Miss?
- What Should You Try at Your Next Session?
- Why the Standard Pumping Advice Falls Short
- Sources
What Is Hands-On Pumping, and Why Does It Work?
Hands-on pumping combines your electric pump's suction with breast massage, compression, and manual hand expression, all in the same session. Instead of just letting the pump do the work, you're actively helping milk travel from the glandular tissue where it's made toward the ducts where the pump can actually remove it.
Suction alone pulls milk that has already collected in the ducts. Compression does something different: it physically pushes milk out of the surrounding tissue, the way a baby's jaw and tongue do during a feed. That's why hospitals lean on it so heavily for parents of preterm infants who can't yet nurse directly, using hands-on pumping to maximize milk production when a baby is still in the NICU.
The evidence backs this up. One randomized study found that combining massage and compression with electric pumping increased expressed milk volume by about 48% compared with pumping alone, and the milk collected also had higher fat content.
- More total volume per session
- Richer, higher-fat hindmilk
- Better breast drainage, which itself signals your body to keep making milk
How Do You Actually Do Hands-On Pumping?
Here's a routine you can follow start to finish, whether this is your first week pumping or your fiftieth.
Before you pump:
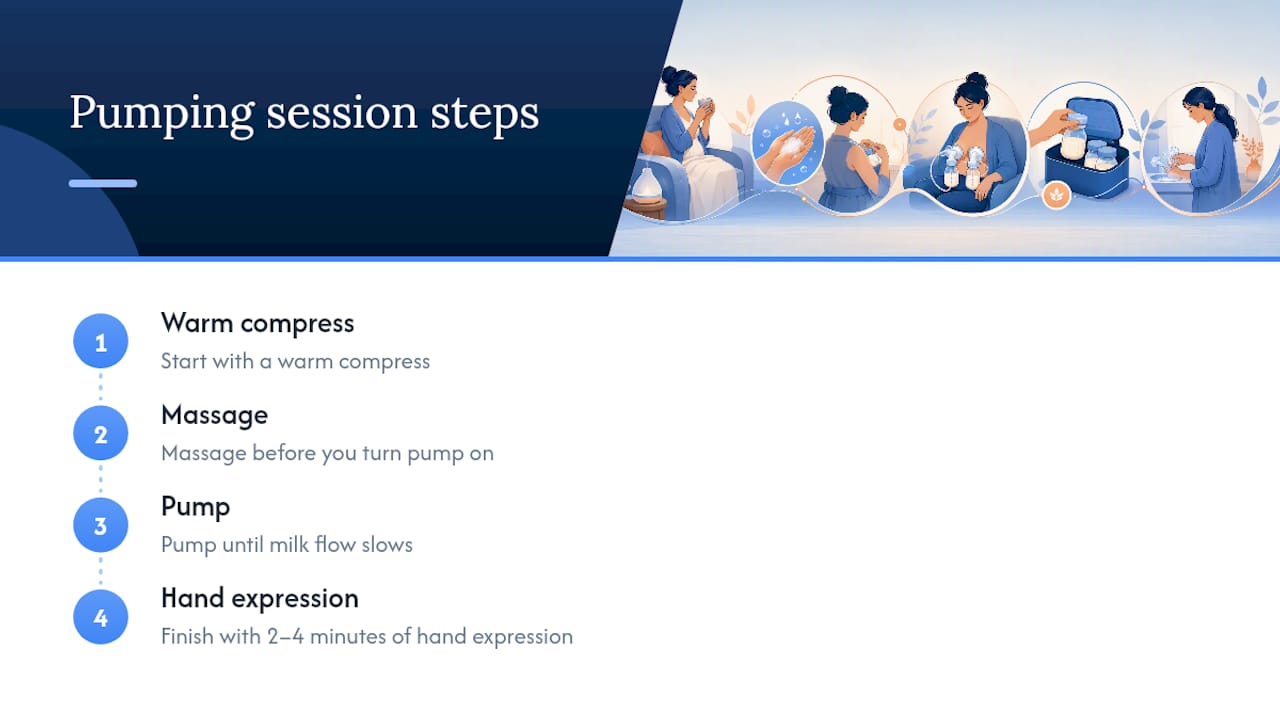
- Apply a warm compress to both breasts for a minute or two, or take a warm shower right before your session.
- Settle into a comfortable, relaxed position. Tension in your shoulders and back can slow your let-down.
- Trigger oxytocin: hold your baby skin-to-skin if you can, or keep a photo, video, or worn piece of clothing nearby. Even smelling something that reminds you of your baby helps, a detail NHS guidance on expressing breast milk backs up.
- Massage each breast gently for 30 to 60 seconds, working from the outer edges toward the nipple in small circles.
During the pump session:
- Set up your double electric pump with correctly sized flanges (more on fit below) and start on a lower suction level to encourage let-down before increasing strength.
- Once milk starts flowing, place your thumb and fingers about 1 to 1.5 inches back from the nipple, forming a "C" shape around the breast.
- Compress firmly and hold for a few seconds, then release. Repeat this rhythm steadily rather than rushing.
- Rotate your hand position every minute or so, moving around the areola like a clock face, so you drain all four quadrants rather than just the spot under your fingers.
After the pump session:
- When flow slows to a trickle, don't unplug yet. Switch to hand expression for another 2 to 4 minutes, continuing the same compress-and-release motion. This final push often captures the fattiest hindmilk that the pump alone leaves behind, a detail confirmed by UW Health's guidance on gentle hands-on pumping.
Pro Tip: If one side consistently lags behind the other, spend an extra 60 seconds hand expressing that breast at the end of every session. Lopsided supply is common, and a little extra attention on the slower side usually evens things out within a couple of weeks.
How Often Should You Pump, and For How Long?
Frequency matters more than any single session's technique, especially in the early weeks when you're building supply from scratch.
- Aim for frequent pumping sessions throughout each 24-hour period if you're exclusively pumping or working to establish supply, matching the frequency a newborn would naturally feed. This lines up with AAP guidance on breastfeeding frequency.
- Each session should run long enough to fully drain both breasts but not so long it becomes exhausting, typically around a moderate duration per session.
- Adjust based on your output and your energy. If you're consistently getting little after 15 minutes, shorten sessions rather than pushing through fatigue.
- Save power pumping (short bursts mimicking cluster feeding) for occasional supply dips rather than making it a daily habit; it works best as a targeted boost, not a routine.
- Pairing pump times with your baby's natural feeding schedule, when possible, keeps your body's rhythm consistent even on days you're away from your baby.
When Should You Stop, and What If It Hurts?
Pumping should feel like firm, steady pressure, never sharp pain. A useful comparison: the pressure should feel similar to petting a cat firmly, not gripping it. If something hurts, stop and reassess before continuing, since pain during hands-on pumping is a signal to reduce pressure, not push through it.
Watch for these warning signs that point to something beyond normal soreness:
- A hard, red, wedge-shaped area on the breast (possible blocked duct)
- Fever, chills, or flu-like body aches paired with breast tenderness (possible mastitis)
- Cracked, bleeding, or blistered nipple tissue
- Output that has dropped noticeably over several days despite consistent pumping
If you're seeing infection signs like fever or spreading redness, contact your doctor promptly rather than waiting it out.
For lower-stakes troubleshooting, work through this checklist first:
- Recheck your flange size. A nipple that rubs the tunnel walls or gets pulled in too far usually means the fit is off.
- Lower your suction setting slightly. Higher isn't always more effective and often causes pain that reduces let-down.
- Stay hydrated and try varying your compression rhythm session to session.
- Check your pump's tubing and membranes for wear. A 48% jump in output was tied specifically to added massage and compression, not stronger suction, so a worn-out pump motor isn't usually the real fix.
What Equipment Do You Actually Need?
A double electric pump is the practical starting point for most parents, since pumping both sides at once saves time and tends to yield more overall than single pumping. Flange fit matters just as much as the pump itself: your nipple should move freely inside the tunnel with minimal friction, and if your areola is getting pulled in too far, size up.
A hands-free pumping bra frees both hands for compression and massage while the pump runs, which is really the whole point of this technique. If you don't have one, a snugly fitted sports bra with holes cut for the flanges works in a pinch, or you can prop the flanges with one hand while massaging with the other.
- Wash your hands before every pumping and hand-expression session.
- Sterilize pump parts according to your manufacturer's instructions, especially in the first few months.
- Store expressed milk promptly following safe refrigeration or freezing guidelines.
- Washable, reusable breast pads designed for sensitive skin can help with leaking between sessions without irritating already tender skin.
Manual hand expression alone, without any pump, is also worth learning early on. It's a genuinely useful skill for collecting colostrum in the first days postpartum or relieving engorgement when your breasts feel too full to pump comfortably.
What Do Lactation Practitioners Notice That Parents Often Miss?
Small adjustments make outsized differences. A slightly different hand angle, a change in compression rhythm, or moving your fingers half an inch closer to the areola can shift output more than switching pump brands ever will. Lactation practitioners often spot this in minutes during an in-person session, something that's genuinely hard to self-diagnose from an instruction sheet.
If your baby has latch difficulties, isn't gaining weight as expected, or your supply has stayed stubbornly low despite consistent hands-on pumping for two or more weeks, that's the point to bring in professional support rather than keep troubleshooting alone. A certified lactation consultant can watch your technique in real time and catch what's easy to miss on your own, and when feeding challenges extend beyond supply into how your baby actually eats, pairing lactation support with feeding therapy often gets better results than either alone.
Pro Tip: Bring your pump and flanges to your consultation, not just your baby. Practitioners often catch flange sizing issues in seconds that parents have been quietly working around for weeks.
What Should You Try at Your Next Session?
Start simple: warm compress first, massage before you turn the pump on, and finish every session with 2 to 4 minutes of hand expression once flow slows. Those three moves alone capture most of the benefit this technique offers.
If output stays low after a couple of weeks of consistent effort, or your baby shows signs of a latch problem or slow weight gain, don't keep troubleshooting solo. Thriving Joy's lactation counseling services can help you sort out fit, rhythm, and technique in person, with guidance tailored to your specific feeding goals.
Why the Standard Pumping Advice Falls Short
Most pumping guidance stops at flange size and suction settings, as if output were purely a mechanical problem. The research says otherwise.
What gets underrated is persistence after flow slows. Parents unplug the moment the pump stops pulling milk, but the last few minutes of hand expression often hold the richest, highest-fat milk of the whole session. Skipping that step is probably the single most common missed opportunity I see in how this technique gets taught.
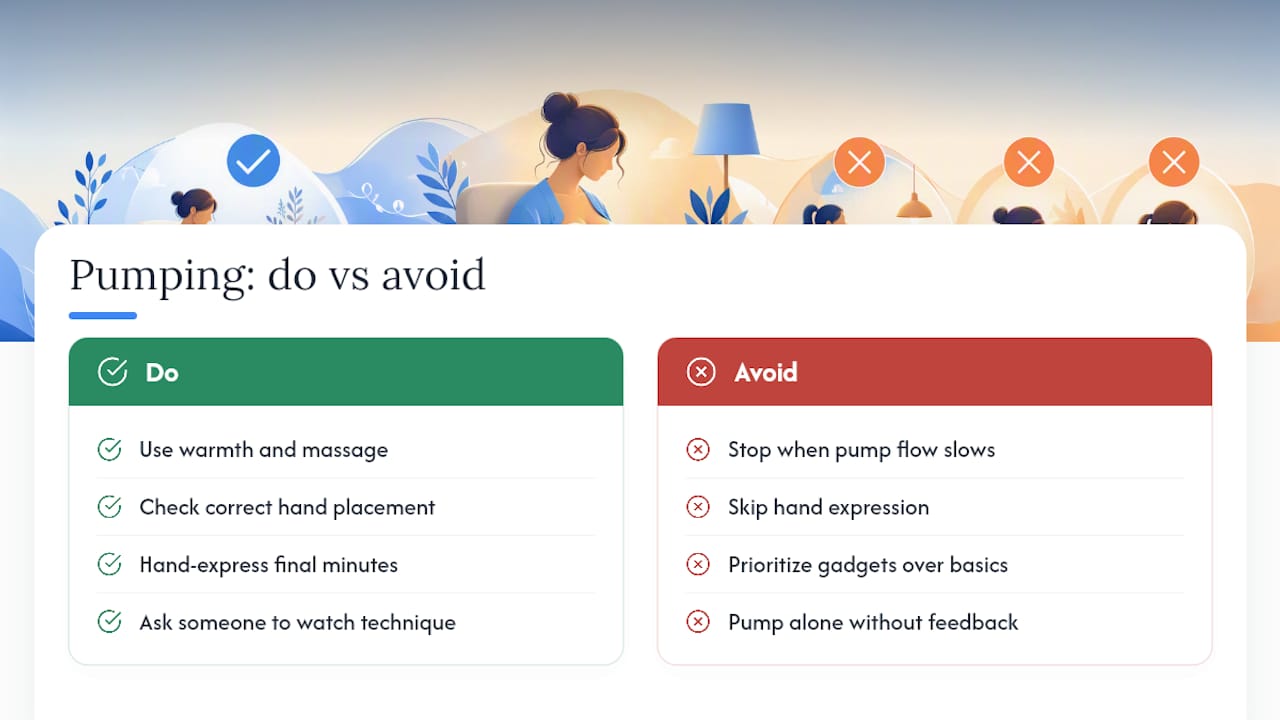
Where conventional advice really falls short is treating pumping as a solo, self-taught skill. Rhythm and hand placement are physical techniques, and physical techniques improve fastest with a second set of eyes watching you do them. If you've been pumping for weeks and still aren't sure your technique is right, that's not a sign you're doing something wrong. It's a sign you're due for someone to actually watch you pump.
Prioritize the basics first: warmth, massage, correct hand placement, and that final stretch of hand expression. Everything else, pump brand, app tracking, fancy flange inserts, matters far less than those fundamentals done consistently.
— Jamie
This article is general information, not a substitute for advice from a qualified doctor. Consult a qualified healthcare professional about your own circumstances before acting on anything here.
Sources
- PubMed: Hands-on pumping study
- AAP: Breastfeeding frequently asked questions
- Stanford Medicine: Maximizing Milk Production with Hands-On Pumping
- NHS: Expressing breast milk with a pump